🎧 Usage Instructions - www.Diplacusis.com Self-test App
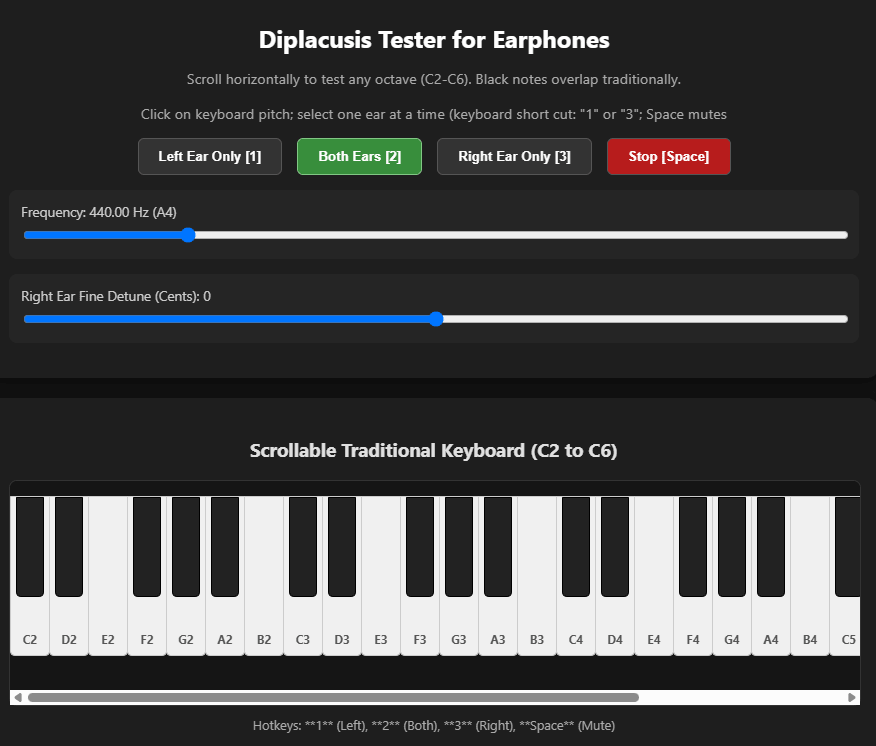
- Begin with a low setting for volume. Adjust the amplitude (volume) to a low, but comfortable level. For certain frequencies where there is hearing loss, you may have to boost the amplitude.
- Headphones Required: Always perform tests using quality stereo headphones. Computer or device ambient speakers will not work at all in isolating left vs right.
- The app assumes you either have skills for relative pitch or pitch matching/comparison. Diplacusis skewed perception can be very subtle, especially if distortions are introduced in the inner ear.
The just noticeable difference (JND) in pitch for human perception is typically around 3 to 10 cents - Upon using the app for the first time, it is common to think the app is "wrong" - you may be perceiving a different pitch between ears. Reverse your earphones to prove to yourself that L & R have the same pitch (of course, before you adjust (compensate) one ear).
- Determine through experimentation WHICH ear has Diplacusis. This app will likely be of no help if BOTH ears suffer from similar or differing modes of Diplacusis.
For those with relative pitch, trySTARTandNEXTsequencing to see if that ear is perceiving the expected pitches, OR press piano keys at an octave of fifth to compare.
Suggested experiments: one ear at a time, "play" (click) notes various octaves apart and see if they "sound like octaves". If you have good RELATIVE pitch, play other notes to see which ear perceives "logical" interval perception. Once a "good" reference ear is determined, toggle (if needed) theTARGETbutton to set the app to identify the "bad" ear-- this will be the ear affected by the adjustment/compensation sliders, such that you can de-tune (or "correct"/compensate for the skew) that bad ear to now be the same perceived pitch. Often Diplacusis introduces distortions such that it is difficult to decide which harmonic is the fundamental (due to "neighboring" cilia in the cochlea firing (bending) to register perceiving that pitch).
If you determine that both ears are afflicted, but one ear is generally accurate except for a small range, you can still compare the good part of the range. - Trilling Shortcut: Use computer keyboard shortcut/hotkeys
1(Left Ear Only) and2(Right Ear Only) to alternate between ears
-->"trill" typing 1 & 2 while adjusting the detune sliders until the perceived pitch matches.
pressSpaceto stop audio playback - Two useful features were added to facilitate matching/identifying pitches in the afflicted ear:
- Control-click (windows) on a piano key will TEMPORARILY play that clicked pitch in the reference ear... thus you can pole around to find the nearest pitch.
- Once you identify the skeywed interval, Shift-click on a piano key will log that skew.
- If you are perceiving overtones (harmonics) for a given note, you can
Llog multiple pitch perceptions. (Normally at each change of reference pitch, the log is updated, even if the pitch was perceived accurately) (or shift-click on the perceived key) - The
Both(ears) button has limited usage other than to test the operation of your headphones. In fact, even tho Diplacusis, in and of itself, does not cause difference tones (beating) in your perception, using theBothbutton WILL result in actual difference tones (beat frequencies/combination tones, or Tartini tones) in the earphones.
Binaural difference tones have been reported where the brain assimilates a phantom beat frequency internally when presented with slightly differing pitches in each ear - likely nothing to do with Diplacusis. - Log Offset: Press
Lor click Log Offset to record pitch skewmeasurements and subjective acoustic characteristics (amplitude drop, harmonics, unmatchable pitch).
The app produces pure tone fundamental sine waves (similar to a flute without its harmonics). Without diplacusis, the left vs. right comparison should be identical and not distorted. - If you have difficulty discerning the pitch (amplitude is very soft, there are harmonics/distortions, or it's just not matchable/recognizable), tick one of the three checkboxes before moving on to clicking a next pitch to test. This will make a notation in the Skew log.
- Use the bottom horizontal slider to move the keyboard range to test additional pitches in other ranges.
- COPY will copy the logged skew deviations to your text clipboard. At a future date, we may offer a separate app to read the CSV file results and graph them in order to track the skew changes over time (typically every few months it will change).
SUGGESTED USAGE STRATEGIES
The app has several usage “modes” (approaches), and people can poke around to see which suits them the best.
Techniques for SELECTING the SEQUENCE of the pitches for matching:
- There are simple
STARTandNEXTbuttons to present pitches,
and for each pitch, you find the matching pitch (see below)
and then go to theNEXTnote in sequence (which is four pitches per octave) - Click on a note of your choice, and find the matching pitch (see below)
- In the case of both ears being affected (likely differing skews), use your relative pitch to go up and down arpeggios (spelling major chords, perhaps with minor 7th) for the range of the piano keyboard. By trial and error, find which notes seem to match an octave apart, and shift-click the perceived note (while playing the performed note). Sometimes the brain will start acclimating to what it thinks the pitch should be and thus confuses the match. Also try ascending vs. descending arpeggios – some people find that descending sounds correct (octave over octave), yet ascending the same notes are off.
Techniques for Playing the notes to each ear for comparison:
- “TRILL” (typing) 1 or 2 (at a comfortable speed for changing ears),
OR - TYPE the ALT key (momentarily while pressed) to switch ears
- Click on the
LEFTorRIGHTbuttons. (may be awkward to click)
Techniques for Finding the Matched pitch:
- Adjust the sliders (pitch adjustment/skew-compensation with your mouse) to make the bad ear match the good ear; once found click
LOGbutton (or keyboard shortcut command: L ), and then go to the next note;
OR - Use CTRL-click (on piano keys) to TEMPORARILY play the note clicked such that you poke around on the keyboard to match the pitch; once you find it, you log the pitch (for the r.h. column) by SHIFT-clicking the found matching key
Archive Results
After you’ve gone through sufficient notes, save your self-test results for future comparison (or graphing) by clicking on EXPORT CSV
SUMMARY OF COMMANDS, BUTTONS, KEYBOARD SHORTCUTS
LEFT Direct the audio tones to the LEFT earphone. Keyboard: 1
RIGHT Direct the audio tones to the RIGHT earphone Keyboard: 2
BOTH Direct the audio tones to the BOTH stereo earphones Keyboard: 3
STOP Mute the audio tones (until another piano key is clicked or START is clicked). Keyboard: SpaceBar
TARGET Toggles between selecting the L or R ear as the "bad" ear. The designated Target ear is the one that is affected by the Pitch Adjustment sliders.
LOG Snapshots the current pitch data to the r.h. column (and later potential EXPORT) Keyboard: L
START Begin a sequence of pitches at C2.
NEXT Proceed to the next in the built-in series of chordal pitches: C - E - G - A# (repeated for each ascending octave)
COPY Copies the current r.h. column data to computer textural clipboard
EXPORT Writes the Pitch Skew Log Data to a CSV file that you select the filename for.
CLEAR Erases the log snapshots data from the r.h. column. This does not affect your computer's copy buffer, nor previously saved CSV files.
ALT-KEY: Temporarily switches ears (while depressed)
CTRL-CLICK (windows): During the process of having selected a reference pitch, when Control is pressed while clicking on a piano note, that note's pitch is played while the mouse is (left) clicked.
SHIFT-CLICK: This logs the current pitch in the Results Log r.h. column.